Wednesday 12 October 2011

First Exhibition

Hi Everyone, Last week end there was an art fair in my little town of Cowansville, and I showed my worked for the first time to "the world"... It was the perfect day, sunny and hot, (hey i'm in canada and sometimes this time of year it's rainy and cold you don't want to put your nose outside) but no everybody was happy and walking in the streeet to see what was happening here.


So here are my work from my first exhibition!

The First Four from the man-bird serie are made with a home made paper clay over a wire armature. Wings are made with twigs, wood dowels, fabric, thread and feathers of course.


Icarus (from a painting of Daniel Barkley)


Icarus (detail)


La Chute d'Icare(D'après Dupras)

Le Rêve d'Icare


Le Rêve d'Icare (detail)


Le Vide


Le Vide (detail)


"Femme Marchand sous la Pluie" is made of wire and threads covered with Paverpol.

Femme Marchand sous la Pluie


Femme Marchand sous la Pluie (detail)


"Etude de Mouvement 1! is made of white plaster.


Etude de Mouvement
And the last one is very hard to take a photo of, because of the glass, and because it's a relief! Anyway this is what it look like!

Autoportrait d'Egon Shiele


I was kind of proud of this one, and guess what this is THE one I sold!!!! My First sale!!!

So that's it for tonight, good luck with your own project, and stay tuned for the next post will be clothing!!!

Boutriack for a man with scissors


Sunday 29 May 2011

New Jeans!!!

Hi Everybody, no i haven't been lazy these past few months, i been working on many projects. Here are 2 of them. Jeans....

Using my method how to copy your favorite jeans, here are the results


A Bientot!

Monday 31 January 2011

Winter Fantasy

Hi Everyone, here is my contribution to the Winter Fantasy challenge on the Cloth and Clay doll ning group.
There were no rule excepting the theme!


Since i've made a few reindeer antlers for christmas time, i tough i could continue on this vibe, by doing a doll with antlers. And why not on 4 legs?
So this is it!
Its made of cloth, paperclay, white fur, on a wire and foil armature.

Wednesday 26 January 2011

My last semester Pieces

Hi There! Last Fall I began a sculpture class at Bishop's Universty. We worked with clay, then we make a plaster mold, remove the clay from the mold, and then poured in TuffStone. So the final result is in TuffStone!

The mask was our introducing into the big world of sculpting, it was to learn the ''low relief''.

Then I did a finish on it with brass powder and graphite. I colored the Tuffstone a brownish color before mixing it.


Then we moved to the 3d project. We had to do a piece easily molded and unmolded... with a wider base.


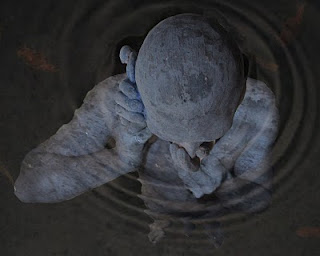
I made a head like if it was burried or under water, i chose the last option, that is why the blue color, after i finiished the head, i had this idea of making a photoshop of me, like if i was in water. This is the result!!!


For the winter semester, we needed to choose a picture, painting or drawing i choose a painting from Egon Schiele, from wich we'll do our projects.


So the first project is to make a low relief, from that painting, this is where I'm right now. Still working on it.
See you!!!

Monday 24 January 2011

How to copy your favorite Jeans Part 2

Welcome again!

This is part 2.
Now with the outline of the pattern it's time to redefine all the lines using a straight and a curved ruler. What you want is to have continous lines without breaking points, so it is going to be easy tu cut and sew in fabric.

Some times it is not possible to use any kind of ruler, so you just do it free hand.

Now the lines are clean, you can add sewing allowances.

With another piece of paper under, mark all the pockets, flaps, yokes, basically every piece of pattern you will need to make the jeans, add seam allowances and cut.
Now very important, you need to check the outside seam of the front panel with the outside seam of the back panel to see if they match! Do this also for the inside seam.

In my case they were not matching, so i needed to add a piece of paper to make the corrections.

Now I cut the fabric, if this is you first pattern you can try it with bad fabric to test your pattern, to day I feel I was in a good moon, so I went right away with the good fabric, an oatmeal corduroy.

How should you cut the corduroy??? Or any velvet???
You need to find the top of your piece of fabric, to find it rub the fabric with your hand, you need to find the rough way. The rough way is going down the pant or the dress, and the soft way is going up. Why is that? Because the color will be a lot nicer way. It is not very visible with corduroy, but for the velvet it makes a lot of difference. Try with 2 pieces of the same velvet, put them side by side one with the rough way going down and the other going up, you will see!!!


Now all you have left is to pin everything in place making sure to place grain lines correctly and cut.

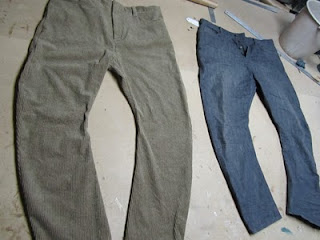
So here is the 2 jeans side by side, you can see there are some differences, because i did some modifications in the process, like make them longer, and a little bit wider at the bottom.
Don't forget, 2 fabrics dont ''fall'' the same with the same pattern, my corduroy was a lot ''softer'' and more ''dropping'' then the jeans, so the look is bit different.
Good luck with your project!

How to copy your favorite Jeans Part 1

You just bought a bran new pair of jeans and you know that these are the one you were looking for for century!!!!!
And you would like to have the pattern so you make one or two exactly the same?
Or you can do them in another fabric, or color?
So here is my way of doing so!
First here is the starting point a jeans bought at AllSAINTS, these are gray denim with a low crotch style,a twisted seam and a narrow leg.


So let's start!

Here is the jeans laying flat, as you can see the leg is kind of weird for a pant that is why I chose these ones...


On almost all kind of fabric if you look carefully, you can see the grain line of the fabric, here I ''Marked'' with a needle and white thread the grain line of the front panel and I did the same for the back panel also.

Now, take a piece of paper, it needs to be big enough to do the entire piece of pattern for the front leg. I like to place it on top of a towel or something similar, it makes a kind of cushion underneath so we'll be able to make tiny holes with a pin or a needles roller. Oh and dont do this on you nice kitchen table....your mother will be very angry at you and you won't like if that happens...


With a pencil and a yard, draw a line, this will be your grain line. Then place your jean on top of this line and pin the jeans here and there to match the 2 grain lines together.

Then start marking the contour of the jeans.

But you're asking what to do when the sewing goes under....

Here is my trick!


After marking the contour, with a pin I marked the fold line of the fabric. And when i turn the bottom of the leg i can see how much fabric was folded underneath!!! I just need to mesure (in my case 1 inch) and add this inch to my pattern.


Do this every time your seam switch side!! For me the 2 sides were not the same


On the next picture I marked with a needlle the ''point where the seam is right on the edge of the folding.

Now the seam is on top, this is easy, you just need to use a needles roller, and pass over the seams.


Mark Everything you can mark with the needles roller. Don't forget to mark the end of the zipper


And the front pocket!


Now you can do the same for the back leg pattern.


So here is the end of part 1, part 2 is following...